

|
|
|
|
| Fiat Allis 21C |
The Fiat Allis 21C was the final rendition of the famous 21 series begun by Allis Chalmers. Before that they had an HD20 which dates back to the days when Allis Chalmers used Detroit Diesel engines. However, the 21 series begun in the Early 1960's featured an Allis Chalmers engine which originated with Buda. This engine was good and easy starting when applied to a dozer.
Models to be found of the 21 series include the HD21A model, the HD21P model, the 21B and the 21C. The A model (featured elsewhere on this site as we used to own one) featured a manual transmission behind a torque converter. Early models used a diesel converter and later ones had the oil converter. The hydraulic system was an add on module driven off the front of the engine.
The HD21P was an update of this differing in that it had a full powershift transmission instead of the manual shift. The 21B was a major redesign with the hydraulic pumps moved back to the converter and the hydraulic system integrated into the machine. The 21C picked up the design features of the 31 and looks like a scaled down 31. Notably the steering clutch controls are moved off the dash board and onto the left arm rest. The full cab is a tilt back model for good access to the transmission and converter, and like the 31 it is equipped with spring set brakes so if the engine dies or the machine is placed in neutral, the brakes set. Somewhere along the line the engine power grew from 270hp found on the HD21A to 300 hp featured on the 21C which is really a contemporary of the Cat D8K.
You might as well take a good look at this because it is a fairly genuine orphan. Various US machinery companies have been traded around like baseball cards and more recently the parent company, Fiat has ended up owning, Case, Fiat Allis(formerly Allis Chalmers), Link Belt, and a host of farm equipment names including Case, Allis, White, Oliver, Massy, Ford, New Holland, IH to name a few. The Fiat Allis nameplate has been withdrawn from North America as Case has a much strong market presence and it doesn't make a lot of sense for Fiat to compete with itself. Good or bad the Fiat Allis equipment is history and parts are rapidly becoming more problematic.

|
| Fiat Allis 21C |
This particular machine spent most of its life to date as a chip dozer for a local paper mill. It was equipped with an 18 foot Young U dozer blade for pushing wood chips. It has max width pads to provide low ground pressure, and since it was a chip dozer there never was an occasion to have a ripper or winch on the back so just a counterweight was provided. We will be changing the blade to a general purpose dozer and putting an attachment on the back as well.
This last photo show her all dressed out with a blade and a ripper. The machine is a snoozy thing. I"ve had a bit of trouble breaking the braces out of the blade as it seems to have more power than sense. Hopefully I have all the weak ones weeded out now but it has been a drill.
Repowering any machine is always a drill. This 21C proved to have a lame engine which had been overhauled so many times that there were no more overhauls in it. Likewise parts are an issue. Reluctantly we made the decision to scrap the engine and seek to repower it. Major issues in any repower include finding a suitable engine that is affordable and will fit. The stock engine is a pretty standard size engine which is a good thing.
The punch list of things to be addressed in the repower include:
Repower Punch list
Our first effort at the repower was a failure. Our first plan was to install a Cummins L10. I was off to the auction and bought an IH goat for the right price with a Cummins L10 in it. Promptly I learned a few things. The L10 was a low flow model which is a particular type of cooling system which is suppose to use a very efficient radiator, but circulate less water than normal. This scared me, but I will never know if I could work with that o r not as other things were more discouraging. I did find an L10 with an SAE #1 bell housing which is what I wanted, but when I got it apart to my horror I found that it is almost standard in these rigs to use an SAE #2 flywheel and a bell housing with an SAE #2 starter placement. I had a big ring to mount on the flywheel that needed a flat faced SAE #1 flywheel. I shopped the second hand market for parts and came up empty handed. No one in any junkyard I could find admitted every having seen an SAE #1 flywheel and bell housing for a Cummins L10. They are in the Cummins catalog, but buying a new flywheel and bellhousing from Cummins would cost so much as defeat the cost effectiveness of the repower. The engine just looked like a money pit. The turbo charger was bad, and I was afraid of the cooling system so I abandoned that effort.

|
| Adapter Plate |
|
| Bell Housing Ready |

|
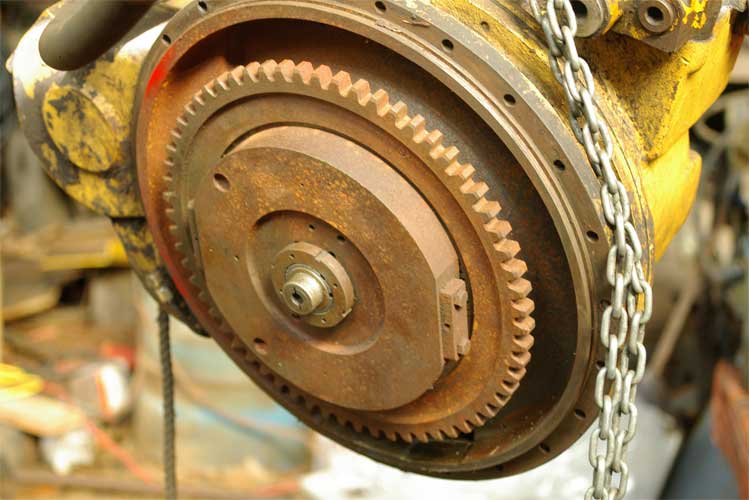
| Flywheel installed |
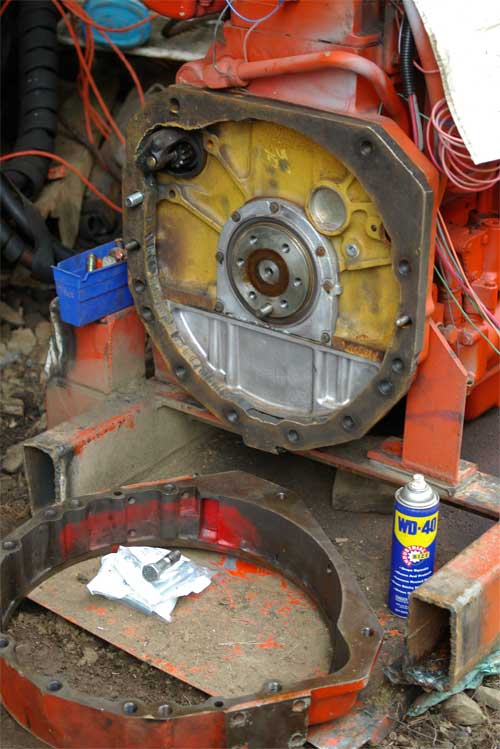
| The bell housing needs to be a 'wet' housing. The drain plug on the bottom will upon installation be converted to a gravity return line to the transmission. |
We tossed the net out again. This time we drug in a John Deere Industrial engine. IT had been sold to a guy with a vision of making a better combine. The engine had been around for a while, but the prototype combine that it had been in never worked. The paint wasn't fully burned off the exhaust manifold. It would our second attempt at the repower project. We got the engine and it in fact had an SAE #1 bellhousing and a large flat SAE#1 flywheel. The 21C engine has a cast flywheel with an inside out gear on it that the converter sticks into. Now I knew that SAE #1 flywheels could be adapted to this configuration because I've junked out a FIAT-ALLIS 31 which used the same connector, and they have a ring bolted to the flywheel that takes the converter drive. You can't recover an adapter ring from the 21C because it doesn't have one, but I could get the ring from our retired 31 and did so. Some quick measurements indicated that with the most trivial amount of machining on the flywheel we could mount the adapter ring.
|
| John Deere Engine Bare back |
|
| Converter Front |
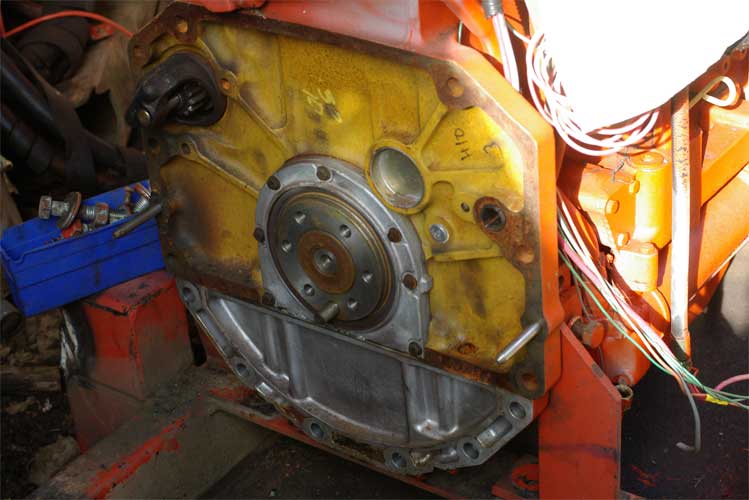
| Bolt up pattern is SAE #1 with optional 24 bolt pattern in lieu of standard 12 bolts. |
IT took a couple of hours to get the flywheel perfectly set in our big lathe chuck all to make a couple of passes on a borehole that was no more than a 1/4" deep. The secret here was having a lathe big enough to chuck up an SAE#1 flywheel. Our lathe was plenty big. It will turn 4 feet in the gap, but our 18" 4 jaw chuck was at its limits with the jaws reversed to grab the flywheel. The flywheel then went to the vertical milling machine where the drilling and tapping was accomplished for the adapter ring. The ring was bolted down with Allen head bolts, and then the flywheel was rebalanced, ( a job that we outsourced).
This did not resolve all of our mating problems however. These converters have a power activated clutch on the front of them and our flywheel was no were near 'hollow enough' to proved clearance for this. We had a solution for this however. The Deere bellhousing is a 2 piece affair. This dates to the heritage of the engine as a tractor engine, as Deere Tractors bolt the engine to a Torque Tube instead of a bellhousing, and Deere just made an SAE Adapter. After a lot of soul searching we determined that we could resolve our clearance issues by making a 1" thick spacer--and space the bell housing back an inch. On the Deere engine the starter is mounted to the block and not the bell housing so the starter wouldn't be disturbed, it would just make the engine 1" longer in front of the rear motor mounts which were on the bell housing. This was a manageable issue so we went for it. We bought a piece of 1" thick plate and cut us a spacer with a big plasma cutter. We chose a Plasma cutter because it doesn't heat and warp things as much as an OXY-ACY cutting system.
The photos on the margin should give you a sense of the issues. By spacing the bellhousing bank an inch we made space inside the flywheel for the stuff sticking out on the front of the converter. The bell housing is dowelled to protect the runout settings but that is something that we will verify. The final issue is the pilot bearing. On the Fiat Allis the Pilot bearing was a ball bearing in the flywheel. By spacing the converter away from the flywheel we also pulled the pilot shaft out of the flywheel so that the end of the pilot shaft sticks into the flywheel about 1/8" of an inch. The converter clutch is a disconnect clutch that is disconnected only when the transmission pressure drops during the gear shift sequence. The clutch is engaged at all times except during the shift sequence. We couldn't very well use a ball bearing so we opted for a steel plug driven in the flywheel with a composite self lubricating bushing.
This is work in progress. We aren't done yet.... so come back.
Update: 1/20/13Progress has totally stopped. This project has now been sitting for 5 years without further work on it. Somehow have the feeling that it never will be done.